DJI Mavic 2 – How to Swap the Cameras
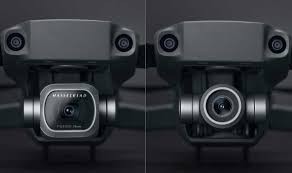
September 5, 2018The DJI Mavic 2 models have been out for a week or so and many people are still struggling with which model to get. DJI announced a camera swap service, see my post titled DJI Mavic 2 – Camera Swap Service, but no details on how long it will take or how much it will cost. Videos on how to swap the cameras have been popping up recently and I wanted to share these how-to’s with you.
The information provided in this post was sourced from TronixFix LLC and ContinueCrushingTech. They make excellent how-to video’s and reviews and I recommend you check them out. I’d like to thank them for making these videos, spending the money on the drones and be willing to risk them in an attempt to inform us.
THIS POST MAY CONTAIN AFFILIATE LINKS. PLEASE SEE OUR AFFILIATE DISCLOSURE FOR MORE INFORMATION.
 Can We Really Do It Ourselves?
Absolutely! There are some concerns that might prevent you from doing so but it can be done. These concerns really break down into two issues:
- This will void your warranty. – Unless you’re a DJI authorized repair facility, performing this work will void your warranty. If you’re OK with this, great, but if not, consider using DJI’s swap service when it becomes available.
- Do you have the skills to perform the work? – I can’t imagine you don’t but, view the videos here and then decide for yourself.
The only issues that I can see popping up are possibly breaking the small plastic piece to the rear of the camera (it has small plastic pins or nodules that require you to kind of pry them out of their holes and I can see someone being a bit too forceful with them) and possibly damaging the cable or cable connector. Just be careful and be mindful of the force you’re applying and you should be fine.
 What Tools Are Required?
Only one tool is actually required and that’s a 1.5mm hex wrench or screwdriver. A plastic pry tool/spudger is recommended but you can pretty much use anything to disconnect the camera cable.
 How Long Does It Take?
That’s the beauty of this procedure. It takes approximately five minutes to perform. The only thing that would have made it quicker is if DJI had put in some sort of quick connect system.
Let’s See the Videos!
This video here was produced by ContinueCrushingTech and shows the presenter swapping out the cameras and performing some basic tests. I love the shock and excitement you see on his face when he starts testing the results:
Sadly the video above doesn’t really have a great angle showing the actual swap out process so check out this video by TronicsFix LLC for a better view:
Here’s another one by ContinueCrushingTech that shows a better angle as well:
Finally, we have an excellent test video showing both the Zoom and Pro with their counterpart’s camera installed. Again this one is by ContinueCrushingTech:
Here Are the Steps In Writing:
OK so you didn’t watch the videos or you did but now you want the steps in written form. No problem! Here you go:
Removing the Camera:
- Setup a clean work area.
- Gather your tools, the drone(s) and/or camera(s).
- Place the drone on it’s back with the camera facing you.
- Remove the two screws at the front of the camera (closest to you).
- Remove the two screws securing the plastic piece over the back (behind the camera).
- Carefully remove the plastic piece making sure to not break the plastic pins or nodules.
- Remove the two screws securing the gimbal and camera that were not accessible until the plastic piece was removed.
- Carefully pry up the ribbon cable.
- Gently remove the gimbal and camera assembly by lifting from the back and pulling up.
Installing the Camera:
- Gently insert the gimbal and camera assembly into the drone making sure to install the front portion under the lip and then lowering the back portion in.
- Carefully connect the ribbon cable.
- Install the two screws securing the gimbal and camera assembly.
- Carefully install the plastic piece making sure to not break the plastic pins or nodules.
- Install the two screws securing the plastic piece over the back (behind the camera).
- Install the two screws at the front of the camera (closest to you).
- Flip the drone over so that it’s no longer on it’s back.
- Test it out and make sure everything is working as it should.
That’s it. You should be good to go.
 Where Can I Get the Cameras?
Right now your only options are eBay or from someone selling a crashed, or otherwise damaged, Mavic 2 for parts. It is not yet known if you will be able to buy the camera from DJI and their affiliates separately or if you’ll need to opt for their service to obtain the other camera. I suspect it will be the service option.
Conclusion
There you have it! Now that you know how to swap the cameras on the DJI Mavic 2 series. It’s easy, takes virtually no time and works without having to update firmware and what not. The only issues are warranty and your comfort level in performing the operation.
Don’t forget to visit the respective video contributor’s YouTube feeds and post a than you.
If you have any questions, comments or want to point something out, please leave a comment below.
Wera 05118066001 2054 Screwdriver for Hexagon Socket Screws for Electronic Applications, Hex-Plus, 1.5 mm x 60 mm
JerryRigEverything Pry Tool Cell Phone Repair Professional Grade Spudger (1, Blue)
Thank you,
Scott Hinkle
MavicManiacs.com


Very informative post! I myself do not any drones but my brother-in-law does and I will have to forward him this article. I know he is going to ask me so I will ask in advance… Do you know when these cameras will be available to purchase other than ebay?? Again, I do not really know what I am talking about but I am certainly looking into Christmas ideas 🙂
I don’t know for sure but my guess is that they will only be available via DJI’s camera swap service, at least officially. I say this because if it’s not don’t by a DJI certified service partner or DJI themselves, it will most likely void your warranty. Not to mention they want to make more $$$.
Amazing! It didn’t take you very long to swap those cameras. I was very impressed by your video. I only watched the first one, but think you did an awesome job. I loved the fact that you were surprised at the results. It seems to me that you are giving out information that a lot of camera buffs will be wanting to watch. Good job — keep up the good work.
I’m glad you liked it. Just to be clear that wasn’t me but someone else who’s video I thought was perfect for this post. With his permission, I was able to embed it here for others to view.
Detailed instructions for simple self-replacement of video cameras on DJI Mavic 2 Pro Quadcopter are presented. There are always cautious buyers and users. They are focused on the replacement of cameras in an authorized service center or other options. Here I have selected several websites for them.1) Announcement and quadrocopters DJI Mavic 2 overview 2) Introducing DJI Mavic 2 Pro / Zoom / CopterTime Blog3) Images for how to change the camera on the DJI Mavic 2 series.I believe that these additions are useful for discussion. The article under discussion is undoubtedly very necessary and useful.
Thank you for the additional websites however I don’t think the links came through to the comment system correctly as I just see the text. Can you try again as I’d like to pass these onto my readers.
Thanks again